Huawei G610 ကုိ ျမန္မာစာမွန္ေအာင္ လုပ္တဲ့ Apk ေလးပါ။
အရင္ဆုံး Root လုပ္ထားဖို႔ေတာ့ လုိပါတယ္။
Super User Request ေတာင္းရင္ Allow ကုိသာေပးလုိက္ပါ။
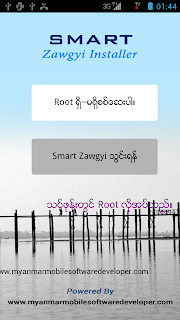
ျပီးရင္ေအာက္က Smart Zawgyi သြင္းရန္ကုိႏွိပ္လုိက္ပါ။
ပီးရင္ Reboot က်သြားပါလိမ့္မယ္…
မက်ရင္ Reboot ခ်ေပးလုိက္ပါ။
ဒီ Font Installer မွာ Frozenkeyboard 1.1.3 ပါထည့္ေပးထားပါတယ္. . .
ျပန္တက္လာတာနဲ႕ စာရုိက္လုိ႕ရပါျပီ။
Myanmar Mobile Software Devmloper ဆိုဒ္က ကူးယူေဖာ္ျပျခင္းျဖစ္ပါတယ္။
download - link 1
download - မူရင္းလင့္
Saturday, December 28, 2013
Friday, December 13, 2013
CD/DVD တြင္ Access Denied Error ကို ေျဖရွင္းနည္း

ပထမနည္း
1. Start ကိုႏွိပ္ၿပီး gpedit.msc ကိုေရးကာ Enter ေခါက္လိုက္ပါ.. Group Policy Box က်လာပါမယ္..
2. ဘယ္ဘက္ျခမ္းမွာ User Configuration နဲ႔ Computer Configuration ဆိုၿပီး ေခါင္းစဥ္ႀကီးႏွစ္ခုရွိပါတယ္.. အဲဒီထဲက Computer Configuration ဆိုတဲ့ ေခါင္းစဥ္ေအာက္က Administrative Templates>System> အတိုင္း ေဘးကိုႏွိပ္သြားၿပီးခြဲသြားလိုက္ပါ.. Removable Storage Access ဆိုတဲ့ Folder ေပၚလာရင္ တစ္ခ်က္ဖိလိုက္ပါ..
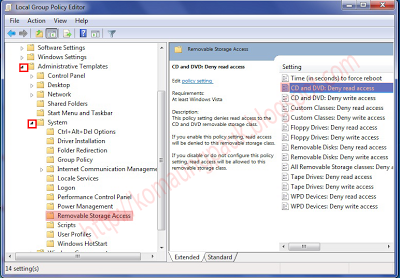
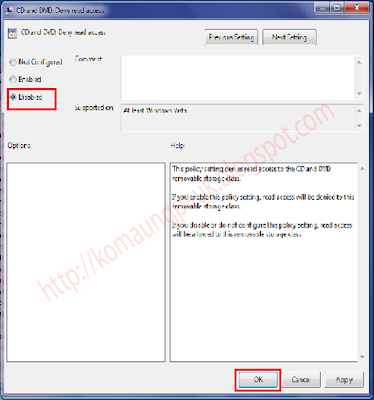
3. အဲလိုဖိလိုက္ရင္ ညာဘက္ျခမ္းမွာ CD and DVD: Deny read access ဆိုတဲ့စာေၾကာင္းရွိပါတယ္.. အဲဒါကို Double Click ႏွိပ္လိုက္ပါ.. ေဘာက္တစ္ခုက်လာရင္ Disable ကိုေရြးၿပီး OK ေခါက္ပါ..
ဒုတိယနည္း
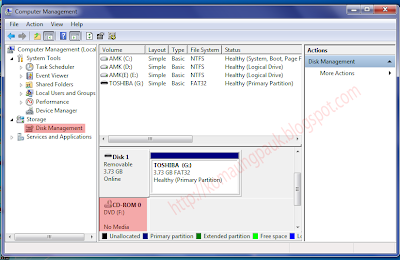
1. My Computer ကို Right Click ေထာက္ၿပီး Manage ကိုႏွိပ္ပါ. ေပၚလာတဲ့ Manage ေဘာက္ထဲမွာ ဘယ္ဘက္ျခမ္းက Disk Management ကိုႏွိပ္ပါ.
2. ညာဘက္ျခမ္းမွာ Disk ေတြကို ေတြ႕ရမွာျဖစ္ပါတယ္.. Error ျပေနတဲ့ CD/DVD Drive ကို Right Click ေထာက္ၿပီး Properties ကိုႏွိပ္ပါ..
2. ေပၚလာတဲ့ေဘာက္ရဲ႕ အေပၚတန္းမွာ Driver ဆိုတဲ့ Tab ကိုႏွိပ္ပါ.. အဲဒီအကြက္ထဲမွာ Uninstall ဆိုတာကိုႏွိပ္ၿပီး CD/DVD ရဲ႕ Driver ကို Uninstall လုပ္ပစ္လိုက္ပါ..
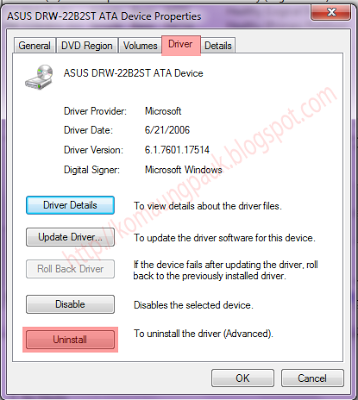
4. ကြန္ပ်ဴတာကို Restart ခ်လိုက္ပါ.. ဒါဆို အဆင္ေျပပါမယ္...
တတိယနည္း
1. Start>Control Panel ကိုႏွိပ္ပါ..
2. အဲဒီထဲက User Account> Manage Another Account ကိုႏွိပ္ၿပီး အေကာင့္သစ္တစ္ခုကို Administer အေနနဲ႔ဖြင့္သံုးပါ.. ဒါဆိုရၿပီလို႔ ဆိုပါတယ္..
အဆင္အေျပဆံုးက ပထမနည္းပါ.. ျဖစ္ႏိုင္ေျခ အမ်ားဆံုးပါ..
အဆင္ေျပမယ္လို႔ ေမွ်ာ္လင့္ပါတယ္..
မိမိကြန္ပ်ဴတာမွာ CD/DVD Drive Icon ေပ်ာက္ေနရင္ ေျဖရွင္းနည္း
ကြန္ပ်ဴတာမွာ System Error ေၾကာင့္ျဖစ္ေစ..Hardware Error ေၾကာင့္ျဖစ္ေစ.. CD/DVD Drive Icon မ်ားဟာ
ေပ်ာက္သြားတတ္ပါတယ္..System Error ေၾကာင့္ဆုိရင္ေတာ့ ေအာက္ေဖာ္ျပပါ နည္းနာမ်ားအတိုင္းျပဳလုပ္
ရံုမွျဖင့္အလြယ္တကူေျဖရွင္းႏိုင္ပါတယ္.. Hardware Error ေၾကာင့္ဆိုရင္ေတာ့ CD/DVD Drive ရဲ႕ Power Connector ေကာင္းမေကာင္း စစ္ေဆးရပါေတာ့မယ္...မ်ားေသာအားျဖင့္ System Error ေၾကာင့္ျဖစ္
တာမ်ားပါတယ္ ..အခု Software ေလးတစ္ခုသံုးၿပီးေျဖရွင္းနည္းနဲ႕ သာမန္အတိုင္း Registry Editor ထဲသို႕
၀င္ၿပီးေျဖရွင္းနည္းကိုတင္ျပသြားမွာျဖစ္ပါတယ္..
CD-DVD Icon Repair 0.2.2.288
Download
or
Download Here
Registry Editor ထဲသို႕၀င္ၿပီးေျဖရွင္းနည္း..... (For Windows7 , Windows XP , Windows Vista)
Windows 7
If you don’t find CD or DVD drive on your Windows 7 computer then you can take help of “Playing and Burning CDs, DVDs, and Blu-ray Discs troubleshooter” to resolve the issue.1. Click Start button
2. On search box, type Troubleshooting. Open the result.
3. On left click “View All”.
4. Click “Playing and Burning CDs, DVDs, and Blu-ray Discs”.
If this method doesn’t work, it might be possible that the problem exists inside your computer’s hardware. You can make use of “Hardware and Devices troubleshooter”. It checks all the hardware issues and confirms that your CD/DVD drive is installed correctly or not.
1. Again click on “Start” button.
2. On search box, type Troubleshooting. Open the result.
3. Under “Hardware and Sound” setting, click “Configure a device”. If prompted for confirmation click “Yes”.
4. Now reboot your computer and check for drive by clicking on Start button and then “Computer”. If the drive is listed then your problem is solved.
======================================================
Windows Vista
1. Press “Start” button.2. In search box enter “regedit”. Click on the result “regedit.exe”.
3. If prompted for a confirmation, click “Allow”. It will open the Registry Editor.
4. In registry editor you have to locate a registry key by expanding directories on left pane. Go to
HKEY_LOCAL_MACHINE\SYSTEM\CurrentControlSet\Control\Class\{4D36E965-E325-11CE-BFC1-08002BE10318}5. Click on folder named “{4D36E965-E325-11CE-BFC1-08002BE10318}”.
6 In the right pane, right click on “Upper filters” and select delete from the context menu. If asked to confirm the deletion, click “Yes”.
If you see a registry entry “UpperFilters.bak” then don’t delete it.
7. If you don’t find any UpperFilters entry then there should be LowerFilters entry. Right click on it and delete it. If asked to confirm the deletion, click “Yes”.
8. Exit Registry editor and reboot your computer. This should resolve the issue and your CD drive icon should now show up.
=========================================================
Windows XP
1. Click Start. Click Run.2. In the Run box, type regedit and click OK.
3. In registry editor, go to
HKEY_LOCAL_MACHINE\SYSTEM\CurrentControlSet\Control\Class\{4D36E965-E325-11CE-BFC1-08002BE10318}4. Click on {4D36E965-E325-11CE-BFC1-08002BE10318} .
5. On the right pane, right click on UpperFilters and select delete from the context menu. If asked to confirm the deletion, click “Yes”.
6. If you don’t find UpperFilters registry entry then there should be LowerFilters registry entry. Right click on it and select delete from the menu. If asked to confirm the deletion, click “Yes”.
7. Exit Registry editor and reboot your computer.
============================================
If the above steps don’t work and drive still doesn’t show up
You have to remove and reinstall the device drivers for the drive. Here I am explaining the process for Windows Vista and Windows XP. Process for Windows 7 is almost same as Windows Vista.Windows Vista and Windows 7
1. Click Start button2. Type Device manager in the search box. Click on the result.
3. On device manager, expand “DVD/CD-ROM drives”. Right-click the CD and DVD devices, and then click “Uninstall”.
4. Reboot your PC.
5. The drivers will be automatically installed after your PC restarts.
Windows XP
1. Go to Start > Control Panel.2. Click System and Maintenance > System.
3. Open the Hardware tab, click “Device Manager”.
4. Expand DVD/CD-ROM drives, right-click the CD and DVD device, and then select Uninstall.
5. Reboot your PC. All the drivers will be automatically reinstalled after restart.
Huawei C8813 မွာ ၁၅၀၀ MEC SIM Card မသိေတာ့တဲ့ Error ေျဖရွင္းနည္း

Naung Lin: အကို...ကၽြန္ေတာ္႔ဖုန္းက
Huawei C8813 ပါ... System Update လုပ္လိုက္မိတာ...Sim Card
လံုးဝမဖက္ေတာ႔ဘူး...ဘယ္လိုလုပ္ရမလဲ..ကူညီပါအကို....
ကၽြန္ေတာ္တို႔ Huawei C8813 မွာ Firmware Update လုပ္မိလို႔ Build Number ျမင့္သြားရင္ 1500 တန္ MEC Sim Card ကို မသိေတာ့ပါဘူး။ Build Number က B175 ျဖစ္သြားရင္ အမ်ားဆံုးျဖစ္တတ္ပါတယ္။ အဲဒီလိုျဖစ္သြားရင္ Build Number B169 ကို downgrade ျပန္ဆင္းရပါတယ္။ ပံုမွန္ B169 dload file နဲ႔ Downgrade ျပန္ဆင္းလို႔မရပါဘူး။
ေအာက္ကဖိုင္ေလးကို ေဒါင္းပါ။
ရလာတာကို ျဖည္ခ်ေပးပါ။ အထဲက UPDATE.APP ကို dload ဆိုတဲ့ folder ထဲ ထည္႔ၿပီး micro sd card ထဲကူးထည္႔ပါ။ ပံုမွန္ Huawei firmware တင္သလို Volume -,+,power ခလုတ္သံုးခုႏွိပ္ၿပီး တင္လိုက္ပါ။
ကဲ...ၿပီးရင္ေတာ့ Huawei C8813 B169 firmware ေလးကို ေဒါင္းၿပီး အထဲက dload ေလးနဲ႔ firmware downgrade လုပ္လို႔ရပါၿပီ။ အားလံုးၿပီးလို႔ Build Number B169 နဲ႔ firmware တက္လာရင္ 1500 MEC Sim Card ကို သံုးလို႔ရပါၿပီ ခင္ဗ်ာ။
Downgrade ဆင္းႏိုင္ဖို႔အတြက္ ေအာက္ကဖိုင္ေလးကို ေဒါင္းပါ။
C8813 B169 firmware ကိုေတာ့ ေအာက္မွာေဒါင္းပါ။
Credit to: myanmarmobileappstore , mm-mpxteam.net ႏွင့္ Credit ေပးထိုက္သူအားလံုးကို Credit ေပးပါတယ္ခင္ဗ်ာ။
HTC Phone မ်ား error ကင္းစြာ Rom update လုပ္ျခင္း
$$$$$$$$$$$$$$$$$$$$$$$$$$$$$$$$$$$$$$$$$$$$
Htc phone အား rom update လုပ္ခ်ိန္မွာ error မတက္ေအာင္ တိက်စြာ ျပဳလုပ္ပံု မ်ား တင္ျပေပးပါမယ္။
radio version and CID number မတူပါက update လုပ္ခ်ိန္မွာ error တက္တတ္ပါတယ္။
ဒ့ါေၾကာင့္ ဦးစြာ software build number, radio version and CID number ကို ၾကည့္ရပါမယ္။
software builder number and radio version ကိုျကည့္မယ္ဆိုရင္ setting ထဲမွ about မွ တဆင့္ software information ထဲတြင္ လြယ္ကူစြာ၀င္ျကည့္ႏိုင္ပါတယ္။
CID number ကိုဘယ္လုိျကည့္ရမလဲဆိုေတာ့
ဖုန္းအား power ပိတ္ျပီး battery ျဖဳတ္ပါ။ 5 seconds ေစာင့္ျပီး battery ျပန္တပ္ပါ။
ျပန္တပ္ျပီးပါက volume down (အသံတိုးခလုတ္) ကိုဖိထားျပီး power button ႏွိပ္ပါ။
(Battery ျဖဳတ္မရေသာ ဖုန္းမ်ားအား bootloader mode ဖမ္းခ်င္ပါက phone အား restart ခ်ပါ။ restart က်ခ်ိန္တြင္ volume down ကိုႏွိပ္ထားပါ။ bootloader mode ၀င္သြားပါမည္။)
bootloader တက္လာပါမယ္။ Fastboot အား power button ႏွိပ္ျပီး ေရြးေပးပါ။
USB ျကိုးတပ္ပါ။Fastboot USB mode အေနႏွင့္ computer မွာ ေတြ႕ရပါမယ္။
computer မွာ ေတြ႕ျပီးပါက computer ကေန command line နဲ႕ phone ရဲ႕ CID ကို ျကည့္ႏိုင္ရန္ လုပ္ေဆာင္ရမွာ တစ္ခုက်န္ေနပါတယ္။
ဘာက်န္တာလဲဆိုေတာ့ computer Local Disk C: ထဲမွာ အရင္ဆံုး fastboot နာမည္နဲ႔ folder အသစ္ေဆာက္ျပီး fastboot folder ထဲကို file 3 ခုထည့္ထားရပါမယ္။
၃ခုက adb.exe, adbWinApi.dll, fastboot.exe ထည့္ထားရပါမယ္။
အဲဒီ file 3 ခုကို Huawei Root မ်ားထဲတြင္ ရရွိႏိုင္ပါတယ္။
အားလံုးအဆင္သင့္ျဖစ္ျပီဆိုရင္ command စရိုက္ေတာ့မယ္။
Run box ကေန cmd ရိုက္ျပီး enter ေခါက္ပါ။
cmd တက္လာျပီဆိုရင္
cd \fastboot enter ေခါက္ပါ
fastboot getvar cid (or) fastboot getvar all ေရးျပီး enter ေခါက္ပါ
CID number က်လာပါမယ္။ cid number က ၈ လံုးရွိရပါမယ္။ (eg. HTC__044 ဆိုရင္ HTC-Asia-SEA-WWE CID region ျဖစ္ပါတယ္။)
CID ရျပီဆိုရင္ firmware ကိုစတင္ ေဒါင္းရပါေတာ့မယ္။
ၤFirmware ကို မိမိရဲ႕ ဖုန္းကရတဲ့CID အတိုင္း ေဒါင္းလုပ္ဆြဲရပါမယ္။
ဥပမာ မိမိဖုန္းက HTC__004 CID ဆိုရင္ HTC-Asia-SEA-WWE စာတန္းပါေသာ firmware ကို ဆြဲပါ။
ဆြဲတဲ့အခ်ိန္မွာလည္း software number ျမင့္ရင္ ပိုေကာင္းပါတယ္။
CID number မတူပဲ firmware ေရးပါက error တက္ဖို႕ မ်ားပါတယ္၊
HTC cid and region list ကို ေနာက္မွ သပ္သပ္တင္ျပေပးပါမည္။
အခုကေတာ့ firmware ေရးဖို႕ ဆက္ျကရေအာင္ !!!!!
ေဒါင္းရလာေသာ RUU ဖိုင္ကို run ထားပါ။
ဖုန္းကို power ဖြင့္ျပီး computer နဲ႕ ခ်ိတ္ေရးပါ။
HTC logo တြင္ ရပ္ေနေသာ ဖုန္းျဖစ္ပါက Fastboot ဖမ္းျပီး computer နဲ႕ ခ်ိတ္ေရးပါ။
ေသးစိတ္ေျပာျပီး ေရးရတာလြယ္တယ္မဟုတ္လား အဲလိုဆိုရင္ ဘယ္ေတာ့မွ error မတက္ေတာ့ဘူး
ဒီစာကိုဖတ္ေပးတာေက်းဇူးတင္ပါတယ္။
Huawei ဖုန္း Step 2 error ကို ဘယ္လိုရွင္းမလဲ ?
Huawei ဖုန္းေတြ အမ်ားဆံုးျဖစ္ပါတယ္ firmware တင္ရင္ step 2 မွာ fail ျဖစ္တာက ဘာေၾကာင့္ျဖစ္တယ္ဆိုတာကို ေတာ့ ကြ်န္ေတာ္အတိအက်မသိပါဘူး
ကြ်န္ေတာ္က developer လည္းမဟုတ္သလို ပညာရွင္လည္းမဟုတ္ပါဘူး။ အခုမွေလ့လာေနဆဲပါ။ ဒါေပမဲ့ step 2 fail ျပရင္ ကြ်န္ေတာ္ရွင္းေနၾက နည္းလမ္း
ေလးေတြကို သူငယ္ခ်င္းမ်ားသိေစလိုေသာ သေဘာနဲ႔ တင္ျပလိုက္ပါတယ္။
1.step 2 fail ျပရင္ ပထမဆံုးအေနနဲ႔ကေတာ့ sd card ကုိလဲ စမ္းၾကည့္သင့္တာပါပဲ။ sd card မေကာင္းရင္လည္း step 2 မွာ fail ျပပါတယ္။
2.ေနာက္တစ္ခ်က္အေနနဲ႔ firmware ရဲ႕ build no ပါပဲ။ တစ္ခ်ိဳ႕ဖုန္းေတြက build no အျမင့္ဆံုးျပန္တင္မွရပါတယ္။ အဲ့ေတာ့ firmware တင္မယ္ဆိုရင္
lastest ေတြတင္တာအေကာင္းဆံုးျဖစ္မယ္ထင္ပါတယ္(ကြ်န္ေတာ့္အထင္ေပါ့ေနာ္)။ build no အျမင့္ဆံုးမဟုတ္ရင္လည္း fail ျပတတ္ပါတယ္။
3.ေနာက္တစ္ခ်က္အေနနဲ႔ huawei flashing tool ေလးကို အသံုးျပဳပီးတင္ၾကည့္ပါ။ တစ္ခ်ိဳ႔လည္း အဆင္ေျပသြားတတ္ပါတယ္။
4.ေနာက္တစ္ခုက clockworkmod recovery(CWM) ေတြေၾကာင့္ျဖစ္ပါတယ္။ အဲ့တာမ်ိဳးျဖစ္ရင္ေတာ့ အဲ့ cwm ေတြကိုstock recovery ျပန္သြင္းေပးရပါတယ္။
stock recovery မသြင္းထားရင္ firmware တင္မရတာ Ascend P1 ကိုင္တဲ့သူေတြ အမ်ားဆံုးႀကံဳၾကရမွာပါ။
ok အာ့ဆို stock recovery ျပန္သြင္းမယ္ but backup မလုပ္မိဘူး။ဘယ္လိုလုပ္မလဲ ?
stock recovery ကို orginal firmware ျဖစ္တဲ့ dload folder ရဲ႕ updata.app ကေနခြဲထုတ္လို႔ရပါတယ္။
ကဲခြဲထုတ္ခ်င္ရင္ေတာ့ ဒီ ဖုိင္ေလးကိုေဒါင္းလိုက္ပါ။ မူရင္း ပိုင္ရွင္ KO Myo ျဖစ္မယ္ထင္တယ္။ ေသခ်ာမမွတ္မိေတာ့လို႔ သက္ဆိုင္ရာ အားလံုးကို creadit ေပးပါတယ္။
ပီးရင္ေဒါင္းထားတဲ့ ဖိုင္ေလးကို zip ျဖည္လိုက္ပါ။ function အေနနဲ႔ သံုးမ်ိဳးပါပါတယ္။ေအာက္မွာၾကည့္ပါ။
ပထမတစ္ခုက updata.app ကေန img ဖုိင္ေတြခြဲထုတ္တာပါ။
ဒုတိယတစ္ခုက ေတာ့ firmware ျပန္တင္တာပါ။
ပထမတစ္ခုကိုေလ့လာရေအာင္။ အယ္ေျပာဖို႔က်န္သြားတယ္ ။ အဲ့ tool ေလးကို သံုးဖို႔ ဒီေကာင္ေလးလည္းလိုပါတယ္ computer မွာသြင္းထားဖို႔။ ဒီေကာင္ေလးကို သက္ဆိုင္ရာ window အလိုက္ ေဒါင္းလုပ္ခ်လိုက္ပါဦး။ ဒီမွာေဒါင္းပါ။
ပီးရင္ computer ထဲမွာ install လုပ္လိုက္ပါ။ ၿပီးသြားရင္ေတာ့ ကိုယ္ခြဲထုတ္ခ်င္တဲ့ updata.app ကိုခုနက ေဒါင္းထားတဲ့ zip ဖုိင္ကို ျဖည္ထားတဲ့ folder ေလးထဲမွာ သြားထည့္လိုက္ပါ။
ပီသြားရင္ အဲ့ folder ထဲမွာရွိတဲ့ runme.exe ေလးကို run လိုက္ပါ ။ update.app ကိုခြဲထုတ္မွာျဖစ္တဲ့အတြက္ နံပါတ္ ၁ ကိုႏွိပ္ပီး enter ေခါက္ပါ။
အာ့ဆိုရင္ ေအာက္ကအတိုင္း updata.app ကိုခြဲထုတ္သြားတာျမင္ရပါလိမ့္မယ္။ အထဲမွာ output folder ေလးတစ္ခုထြက္လာတာျမင္ေတြ႔ရပါလိမ့္မယ္။
တစ္ခ်ိဳ႕firmware ေတြက ဥပမာ C8600 ဆိုရင္ updata.app ခြဲလိုက္ရင္ recovery.img ဖုိင္ တစ္ပါတည္းပါလာပါတယ္။ေအာက္မွာၾကည့္ပါ။
တစ္ခ်ိဳ႔ဟာေတြက မပါပါဘူး။ system.img ဖိုင္ပဲပါပါတယ္။
အာ့ဆိုရင္ ဆက္ျပင္ရပါဦးမယ္ ဒီအဆင့္နဲ႔မပီးေသးပါဘူး။ ကဲ ဆက္ျပင္ဖို႔အတြက္ coding ၾကည့္တဲ့ software တစ္ခုလိုပါတယ္။ ဒီမွာေဒါင္းလိုက္ပါ။
ပီးရင္ေတာ့ အဲ့ေကာင္ေလးကို install လုပ္လိုက္ပါ computer မွာ ။ ခုနက output ထြက္ထားတဲ့ folder ထဲကိုသြားပါ ။ မ်ားေသာအားျဖင့္ boot.img ဖိုင္နဲ႔ recovery.img ဖိုင္ေလးက 11 နဲ႔ 12 မွာပါ။
ဟုတ္မဟုတ္ အဲ့ေကာင္ရဲ႕ coding ေတြကို တစ္ခ်က္ဖြင့္ၾကည့္ၾကည့္ရေအာင္။ နံပါတ္ ၁၁ ေပၚမွာ double click ႏွိပ္ပါ။ select the program form a list ကို၀င္လိုက္ပါ။ ခုနကသြင္းထားတဲ့ program HxD ကိုရွာပါ။ မေတြ႔ရင္ browse ကိုတစ္ခ်က္ႏွိပ္ပါ။ program file ထဲေရာက္သြားတာ ေတြ႔ရမွာပါ။ အဲ့ထဲက HxD ဖိုဒါထဲ၀င္လိုက္ပါ။ HxD.exe ကိုေရြးေပးပါ။ open ႏွိပ္ပါ။ ok နဲ႔ ျပန္ထြက္ပါ။ code ေလးေတြ ျမင္ေတြ႔ရမွာပါ။ ေအာက္ကပံုအတိုင္းပါ ။ ထိပ္အစမွာ android နဲ႔စပါတယ္။ ကုဒ္အေၾကာင္းေတြေတာ့ မရွင္းျပတတ္ပါဘူး။ အေပၚမွာ ေျပာခဲ့သလိုပဲ developer မွ မဟုတ္တာ
အဲ့ code ပါတဲ့ဖိုင္ႏွစ္ခုကို rename ျပန္ေပးပါ ။ အဲ့လို code ပါတဲ့ ဖိုင္ ၂ ခု ျမင္ေတြ႔ရမွာပါ။ အာဆိုရင္ file size ကို တစ္ခ်က္ၾကည့္ေပးပါ။ ဖုိင္ဆိုဒ္ ေသးတဲ့ေကာင္က boot.img ဖိုင္ျဖစ္ၿပီး file size ႀကီးတဲ့ ေကာင္က recovery.img ဖိုင္ျဖစ္ပါတယ္။ အာ့ဆိုရင္ ကြ်န္ေတာ္တို႔ လိုခ်င္တဲ့ recovery.img ဖိုင္ေလးရပါပီ။
recovery.img ဖိုင္ကို ဖုန္းထဲဘယ္လိုသြင္းမလဲ ?
ကြ်န္ေတာ္တို႔ fastboot ကေနသြင္းပါမယ္။ဖုန္းကို fastboot ေခၚလိုက္ပါ။ vol down + power ပါ။ logo မွာၿငိမ္ေနပီ ဆိုရင္ ဖုန္းကို computer နဲ႔ႀကိဳးထုိးပါ။ ဒီေကာင္ေလးကိုေဒါင္းလိုက္ပါ။
ေဒါင္းပီးရင္ အဲ့ထဲမွာပါတဲ့ recovery.img ဖိုင္ကိုဖ်က္ပါ။ ပီးရင္ ခုနကခြဲထုတ္ထားတဲ့ recovery.img ဖုိင္ကို အစားထိုးပါ။ bat ဖိုင္ေလးကို run လိုက္ပါ ။ recovery သြင္းသြားပါလိမ့္မယ္။
stock recovery သြင္းပီးရင္ေတာ့ အထက္ပါ step 2 error ေပ်ာက္ပီေပါ့
အေပၚက ခြဲထုတ္တဲ့နည္းအတိုင္း အကုန္လံုး မရပါဘူး။ တစ္ခ်ိဳ႔ဟာေတြဆိုအဲ့ လို coding ေတြ လံုး၀မပါပါဘူး။ အာ့မ်ိဳးဆို android kitchen နဲ႔ခြဲရတယ္လို႔ ဆြာသမားတစ္ေယာက္ကေျပာပါတယ္။ ကြ်န္ေတာ္လည္းေလ့လာေနတုန္းပါ မသံုးတတ္ေသးပါဘူး။
5.ေနာက္တစ္နည္း အာ့ေကာင္ကေတာ့ firmware ပ်က္သြားတယ္ ပီးေတာ့ recovery ေခၚမရေတာ့ဘူး။ firmware ျပန္တင္တယ္ step 2 fail ျဖစ္တယ္ ။ sd ခ်ိန္းတယ္ မေကာင္းဘူး ? cwm တင္တယ္ မ၀င္ဘူး? အာ့မ်ိဳးဆို ဘယ္လိုလုပ္ကမလဲ ? အာ့ေတြက ဘယ္မွာအျဖစ္မ်ားလဲ ? bootloader unlock လုပ္ကတဲ့ေကာင္ေတြမွာျဖစ္ပါတယ္။ list of booloader unlock
C8812
C8812E
C8813
C8813D
C8825D
C8950D
G510-0010
U8825D
U8950D
Y300C
Y300-0000
C8812 နဲ႔ ဥပမာေပးပါမယ္ ။ အဲ့ေကာင္ေတြမွာ အျဖစ္မ်ားပါတယ္။ အဲ့ေကာင္မ်ိဳးဆို unlock site မွာ ကုဒ္ေတာင္းပါ ။ တရုတ္ဆိုဒ္ကေတာင္းပါ။ ပိုျမန္ပါတယ္(စိတ္ထင္တာေပါ့ေနာ္) :v unlock code ရပီဆိုရင္ code ျဖည္လိုက္ပါ။
code ျဖည္ပီးရင္ stock recovery ျပန္သြင္းပီး firmware ျပန္တင္ၾကည့္ပါ ။ အဆင္ေျပသြားတာကို ျမင္ေတြ႔ရမွာပါ။
ref : http://madmodder.co.uk/huawei_general/how-to-extract-and-identify-recovery-images-from-most-huawei-firmware.htm
ကြ်န္ေတာ္ ေရးသားထားေသာ ပို႔စ္မ်ားက ႏိုင္ငံျခားဆိုဒ္ေတြကေန ေလ့လာထားတာေတြပါ။ ျမန္မာဆိုဒ္ေတြကေန ကူးယူေဖာ္ျပျခင္းလုံး၀မဟုတ္ပါ။ ကူးထားရင္လည္း creadit ေပးထားပါတယ္။
ပီးေတာ့ ပို႔စ္ေရးတာမၾကာေသးတဲ့အျပင္ ထူးခြ်န္တဲ့သူ ၊ developer ၊ မဟုတ္တဲ့အတြက္ အကုန္လံုး နားမလည္ မရွင္းျပႏိုင္တာပါရင္ ဖတ္ရတာ အဆင္မေျပရင္ နားလည္ေပးေစခ်င္ပါတယ္ ။ အမွားပါရင္
ေ၀ဖန္အႀကံေပးတဲ့အေနနဲ႔ comment ေရးေပးေစခ်င္ပါတယ္။ ေက်းဇူးတင္ပါတယ္။
Huawei C8813 ဖုန္းေတြမွာ Step 2 error ေျဖရွင္းနည္း
ကၽႊန္ေတာ္ ကုိယ္တုိင္ အခုဘဲ စမ္းသပ္လုိရလုိ တင္ေပးလုိက္ပါတယ္ အရင္ဆုံူး ကုိ Aung Gyii နဲ Mr.phyo ( နည္းပညာ ) ကုိ credit ေပးပါတယ္

အားလံုးသိျပီးသားလားေတာ့မသိဘူး
ကြ်န္ေတာ္ကေတာ့ခုမွသိရလို႕ေ၀မ်ွလိုက္ပါတယ္C8813 မွာ online update
တင္မိျပီး build no.173/175 တို႕ကိုတင္မိျပီဆိုရင္1500 Sim Card
ကိုမသိေတာ့ပါဘူး firmware downgrade ျပန္ဆင္းမယ္ဆိုေတာ့လဲ step 2 error
ရိွေနပါတယ္ အဲ့ဒါကိုေျဖရွင္းေပးမဲ့
နည္းေလးကိုေ၀မွ်ခ်င္ပါတယ္
ေအာက္ကလင့္ေတြမွာေပးထားတဲ့ ဖိုင္ေလးကိုေဒါင္းလိုက္ပါ ျပီးရင္ Huawei
firmware တင္သလိုမ်ိဳး Dload ဖိုင္ကို SD Card ထဲထည့္ Volume UP+Down
&Power ခလုတ္သံုးခုလံုးတဲြႏွိပ္ျပီးတင္ရပါမယ္ ျပီးရင္ေတာ့ step2error
ျဖစ္ေနတဲ့ 167/168/169 ဘယ္ Firmware မဆိုျပန္တင္ၾကည့္ပါ
ေအာင္ျမင္သြားပါလိမ့္မယ္
ကဲေဒါင္းမယ္
ကဲေဒါင္းမယ္
Download >> C8813 Step 2 Fail
C8813D model အတြက္ Step 2 update fail error ရွင္းနည္း
C8813D ေတြလည္း system update ေပးတဲ့အခါ လုပ္မိျပီး Sim Card မဖတ္ေတာ့တာေတြ
ျဖစ္ေနၾကပါတယ္။
အဲဒီအခ်ိန္က်ရင္ Firmware ျပန္တင္ၾကရပါတယ္။
Firmware ျပန္တင္ရင္လည္း Step 2 မွာ update fail ျဖစ္ေနတာေတြျဖစ္တက္ၾကပါတယ္။
က်ေတာ္လည္း update fail ၿဖစ္လုိ႔လုိက္ရွာရင္း အဆင္ေျပတာေလးေတြ႕လုိ႔ျပန္လည္
မ်ွေ၀ေပးလုိက္ပါတယ္။
လုိအပ္တဲ့သူမ်ားရွိရင္ အဆင္ေျပေအာင္လုိ႔ပါ………………
Download Link 1 : Mega.com မွရယူပါ။
Download Link 2 : Copy.com မွရယူပါ။
Download Link 3 : Zippyshare.com မွရယူပါ။
Download Link 4 : Dev-Host.com မွရယူပါ။
ရလာတဲ့ zip file ေလးကုိျဖည္လုိက္ျပီး ရလာတဲ့ file ထဲက dload folder ေလးကုိ
SD Card ထဲထည့္လုိက္ပါ။
ျဲပီးရင္ေတာ့ Phone ထဲထည့္ျပီး volume up + volume down + power ေလးနဲ႔ dload ေလးကုိ
install လုပ္ေပးလုိက္ပါ။
ျပီးရင္ေတာ့ Firmware ေလးျပန္တင္လုိ႔ရပါျပီ။
သိျပီးသားဆုိရင္ေတာ့ ဆရာလုပ္သလုိျဖစ္သြားတဲ့အတြက္ေတာင္းပန္ပါတယ္။
Creditကေတာ့သက္ဆိုင္သူအားလံုးကိုေပးပါတယ္ဗ်ာ…. 
Huawei Y220T Camera Error Fixing & Root (ကင္မရာေဇာက္ထိုးျပင္ရေအာင္)
Y220T ေတြကို Root လုပ္လိုက္ရင္ ကင္မရာ ေဇာက္ထိုးျဖစ္သြားတယ္....
ကၽြန္ေတာ္ျဖစ္တုန္းက ေလးလံုးဆက္တိုက္ေဖာက္ၿပီးစမ္းၾကည့္တယ္ခင္ဗ်၊
ႏွစ္လံုးတည့္ၿပီး၊ ႏွစ္လံုးေဇာက္ထိုးထြက္တယ္.....ဟဲဟဲ....(ရီဦးေလ...ေမ႕ေနမွာစိုးလို႕ပါ။)
ေဇာက္ထိုးလုပ္ၿပီးသားဆိုရင္ေတာ့ Firmware ျပန္တင္တာေကာင္းပါတယ္။
Y220T Firmware လိုအပ္ပါက......
Y220T Firmware Download
ကင္မရာတည့္ရေအာင္ဒါေလးေတြလိုရင္ေဒါင္းလိုက္ရေအာင္၊
ေဇာက္ထိုးလုပ္ၿပီးသားဆို Research ကေတာ့ရွိၿပီးသားေပါ့ေနာ...။
ေဒါင္းၿပီးရင္ေတာ့ Root တုန္းကလိုပါပဲ Research run ပါမယ္၊ (Research က Bin ထဲမွာပါ။)
- Open
- Browse to Y220T recovery.pac
- Click Play ( ပံုမွာၾကည္႔ပါခင္ဗ်)
- ဖုန္းကို Volume Down ႏွိပ္လွ်က္ႀကိဳးထိုးလိုက္ပါ၊
Pass ျပပါမယ္၊ ၇ စကၠန္႕ေလာက္ပါပဲ။
- ဖုန္းျဖဳတ္
- SDထဲကို Root zip ထည့္/စိုက္
- Volume down+Power.......>Volume Up တစ္ခ်က္ႏိွပ္
- CWM ၀င္>>Install zip from SD>>Choose Root zip>>+++back+++>>Reboot
Restart အျပည့္တက္ေအာင္ေစာင့္ၿပီးရင္ၿပီးပါၿပီ။
အဆင္ေျပပါေစခင္ဗ်ာ။
Sunday, December 8, 2013
Wednesday, December 4, 2013
Free Website ေထာင္နည္း
 ဒီေန႔ေတာ႔
အင္တာနက္ သုံးတဲ႔သူတုိင္း ကုိယ္ပုိင္ ဝက္ဆုိဒ္ ေထာင္ခ်င္သူ ေတြအတြက္
ကြ်န္ေတာ္ Free Website လိပ္စာေတြကုိ စုစည္းတင္ၿပထားပါဗ်ာ ဘာပဲေၿပာေၿပာ
ဘယ္သူမဆုိ Free Website ေတာ႔ေထာင္ခ်င္ႀကတာခ်ည္းပဲ မဟုတ္ဘူးလား သယ္ရင္းတုိ႔
စိတ္ဝင္စားရင္ေတာ႔ ေအာက္မွာ လိပ္စာေတြ ေပးထားပါတယ္ ကလိႀကည္႔ေပါ႔ဗ်ာ
သူမ်ားေတာ႔ မသိဘူး ကြ်န္ေတာ္က Free ဆုိ႔ေတာ႔ ႏွစ္ခု သုံးခုေတာင္ ဖြင္႔ထားေလ
ဟီီးဟီး...ဘယ္လုိလုပ္မလဲ အဆင္မေၿပေတာ႔ Free ပဲ ေရွာက္ေမႊရတာေပါ႔ ဟဲဟဲ....
ကဲသူငယ္ခ်င္းတုိ႔လည္း Free မွာ ႀကိဳက္တဲ႔ဆုိတဲ႔ သူငယ္ခ်င္းေတြ ေအာက္မွာ
ကလိႀကည္႔ေပါ႔ဗ်ာ ကြ်န္ေတာ္ေတာ႔ မလုိက္ေတာ႔ဘူး
ဟီးဟီး.........ေတာ္ေတာ္တရားႀကတာပဲ............
ဒီေန႔ေတာ႔
အင္တာနက္ သုံးတဲ႔သူတုိင္း ကုိယ္ပုိင္ ဝက္ဆုိဒ္ ေထာင္ခ်င္သူ ေတြအတြက္
ကြ်န္ေတာ္ Free Website လိပ္စာေတြကုိ စုစည္းတင္ၿပထားပါဗ်ာ ဘာပဲေၿပာေၿပာ
ဘယ္သူမဆုိ Free Website ေတာ႔ေထာင္ခ်င္ႀကတာခ်ည္းပဲ မဟုတ္ဘူးလား သယ္ရင္းတုိ႔
စိတ္ဝင္စားရင္ေတာ႔ ေအာက္မွာ လိပ္စာေတြ ေပးထားပါတယ္ ကလိႀကည္႔ေပါ႔ဗ်ာ
သူမ်ားေတာ႔ မသိဘူး ကြ်န္ေတာ္က Free ဆုိ႔ေတာ႔ ႏွစ္ခု သုံးခုေတာင္ ဖြင္႔ထားေလ
ဟီီးဟီး...ဘယ္လုိလုပ္မလဲ အဆင္မေၿပေတာ႔ Free ပဲ ေရွာက္ေမႊရတာေပါ႔ ဟဲဟဲ....
ကဲသူငယ္ခ်င္းတုိ႔လည္း Free မွာ ႀကိဳက္တဲ႔ဆုိတဲ႔ သူငယ္ခ်င္းေတြ ေအာက္မွာ
ကလိႀကည္႔ေပါ႔ဗ်ာ ကြ်န္ေတာ္ေတာ႔ မလုိက္ေတာ႔ဘူး
ဟီးဟီး.........ေတာ္ေတာ္တရားႀကတာပဲ............ဒါကေတာ႔ အင္တာနက္ ေလာကမွာ နာမည္အႀကီးဆုံးနဲ႔ လူအႀကိဳက္မ်ားဆုံး Free ဆုိဒ္ေလးပါ
http://www.blogger.com/ http://www.ဒီေနရာမွာမိမိႀကဳိက္တဲ႔အမည္ေပးပါ.bolgspot.com
http://www.multiply.com/
http://www.ဒီေနရာမွာမိမိႀကိဳက္တဲ႔အမည္ေပးပါ.multiply.comhttp://www.co.cc/
http://www.ဒီေနရာမွာမိမိႀကိဳက္တဲ႔အမည္ေပးပါ.co.cchttp://www.weebly.com/
http://www.ဒီေနရာမွာမိမိႀကိဳက္တဲ႔အမည္ေပးပါ.weebly.com
http://webs.com/
http://www.ဒီေနရာမွာမိမိႀကိဳက္တဲ႔အမည္ေပးပါ.webs.comhttp://www.350.com/
http://www.ဒီေနရာမွာမိမိႀကိဳက္တဲ႔အမည္ေပးပါ.350.comhttp://www.ucoz.com/
http://www.ဒီေနရာမွာမိမိႀကိဳက္တဲ႔အမည္ေပးပါ.ucoz.comhttp://grou.ps/
http://ဒီေနရာမွာမိမိႀကိဳက္တဲ႔အမည္ေပးပါ.grou.psအဆင္ေၿပေအာင္ ကလိႏုိင္ႀကပါေစဗ်ာ.............
Memory Card, USB Format ခ်မရရင္ သုံးဖုိ႔
မဂၤလာပါဗ်ာ တစ္ခါတစ္ေလ က်ရင္ Memory Card, USB ေတြ Format ခ်မရတာ
ႀကဳံရတတ္ပါတယ္ အဲဒီ ၿပႆနာကုိ ေၿဖရွင္းေပးမယ္ Lexar USB Format Tool
2013 ေလးပါ အသုံးၿပဳပုံက ေအာက္က ပုံအတုိင္းေပါ႔ File Size (356.58KB)
ရိွိပါတယ္..................................။
မိမိ Format ခ်ခ်င္တဲ႔ Memory Card (သုိ႔) USB ရဲ႕ နာမည္ကုိ ေရြးခ်ယ္ၿပီး
Format ကုိ ႏွိပ္လုိက္ပါ.......................................။
Nero-8.1.1.4 + Serial Key Full Version

nmspmon: ေက်ဇူးျပဳျပ္း Nero ေလတင္ေပပါဦး
ညီေလး တစ္ေယာက္ ေတာင္းဆုိထားလုိ႔ ကြ်န္ေတာ္ လက္ရွိ သုံးေနတဲ႔ Nero-8.1.1.4
ကုိပဲ တင္ေပးလုိက္ပါတယ္ အရမ္းကုိလည္း သုံးလုိ႔ေကာင္းပါတယ္ သူငယ္ခ်င္းတုိ႔
အေနနဲ႔ တစ္ခ်က္ သတိထားရမွာက ေဆာ႔ဝဲလ္ကုိ Install ၿပဳလုပ္တဲ႔အခါ Key
ထည္႔တဲ႔ ေနရာေရာက္ရင္ သူမွာပါေသာ Key ကုိ ၿဖဳတ္ၿပီး Winrar ထဲမွာ Notepad
ထဲက Serial Key ကုိ ၿဖည္႔ေပးပါခင္ဗ်ာ ဒါဆုိရင္ Full Version
အသုံးၿပဳလုိ႔ရပါၿပီး File Size (181.33MB) ရွိပါတယ္
Folder အေရာင္ေျပာင္းတဲ့ Software
မဂၤလာပါဗ်ာ အခုလုိမ်ဳိး Folder ေတြကုိ အေရာင္ေၿပာင္းေပးတဲ႔ ေဆာ႔ဝဲလ္ေတြ
ကြ်န္ေတာ္မွာ ရွိေနတာေတာ႔ ႀကာၿပီး အေႀကာင္းမ်ဳိးမ်ဳိးေႀကာင္႔
မတင္ေပးၿဖစ္တာပါ အခုေတာ႔ Version အသစ္ထြက္လုိ႔ တင္ေပးလုိက္ပါၿပီးခင္ဗ်ာ
ဒါထက္ ေဆာ႔ဝဲလ္ကုိ Full Version ၿဖစ္ဖုိ႔ အတြက္ Crack ဖုိင္ကုိ
အသုံးၿပဳရမယ္ ၿဖစ္ပါတယ္ Crack ဖုိင္ ၿဖည္႔နည္းကုိ ဆုိဒ္ရဲ႕ ညာဘက္ ၿခမ္းမွာ
ရွိပါတယ္ အသုံးၿပဳပုံ အနည္းငယ္ကုိ ေအာက္မွာ ပုံႏွင္႔ တကြ ရွင္းၿပထားပါတယ္
File Size (2.22MB) ရွိပါတယ္....................................။
ပုံတြင္ ၿပထားသည္႔ အတုိင္း မိမိ အေရာင္ေၿပာင္းခ်င္တဲ႔ Folder တစ္ခုကုိ
Mouse ၿဖင္႔ Right Click ေထာက္ၿပီး FolderHighight ကုိႏွိပ္ထားၿပီး
မိမိ ေၿပာင္းခ်င္တဲ႔ အေရာင္ကုိ ေရြးခ်ယ္လုိက္ပါခင္ဗ်ာ ဒါဆုိရင္
မိမိေၿပာင္းလုိက္ေသာ Folder ေလးဟာ အေရာင္ေၿပာင္းသြားမယ္ ၿဖစ္ပါတယ္
Denon Audio (For Android)
Denon Audio (For Android)
ဒီPlayerေလးကေတာ႔Androidဖုန္းေတြမွာ
MP-3 ကုိဒီဇုိင္းတစ္မ်ဳိးေလးနဲ႔အလန္းဇယားေလး
ၿဖစ္ေအာင္နားေထာင္ေနခ်င္တဲ႔ေဘာ္ေဘာ္ဒုိ႔အတြက္
အၾကဳိက္ေတြ႕မယ္ထင္လုိ႔ၿပန္လည္မွ်ေ၀ေပးလုိက္တာပါ
ၾကိဳက္ရင္ေဒါင္းသြားလုိက္ေတာ႔ေနာ္
(File Size 4.66 MB>>>zippyshare<<<)
Photo Shop ဝတ္စုံမ်ား

Version :1.0
Size : 14MB
Format : PNG
O/S : PC
မဂၤလာပါဗ်ာ Gtalk မွာ ညီေလး တစ္ေယာက္ ေတာင္းဆုိထားလုိ႔ Photo Shop
ဝတ္စုံမ်ားကုိ ၿပန္လည္ ေဝမွ်လုိက္ပါတယ္။ ဓါတ္ပုံေတြ ၿပင္တာ ဆင္တာ ဝါႆနာ
ပါေသာ
သူမ်ား ေဆာင္ထားသင္႔ပါတယ္။ မဂၤလာေဆာင္ ဓါတ္ပုံမ်ားလည္း ပါဝင္ပါတယ္ခင္ဗ်ာ......................။
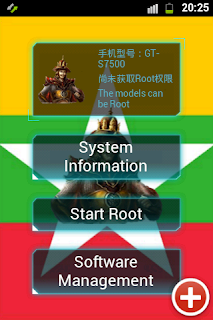
Pro Myanmar root For Android
Version :1.0
Size : 2.65MB
Format : Apk
O/S : Android
မဂၤလာပါဗ်ာ ဒီ Pro Myanmar Root ဆုိတဲ႔ app ဟာ ၿမန္မာ Bolgger ေတြမွာ
လြန္စြာ နာမည္ႀကီးခဲ႔ပါတယ္။ ကြ်န္ေတာ္လည္း အသုံးၿပဳေနတာ ႀကာပါၿပီး
မအားတာနဲ႔ မတင္ေပးၿဖစ္တာပါ။ ကြ်န္ေတာ္ အသုံးၿပဳၿပီး Root ေဖာက္မိသေလာက္
ဖုန္းဆုိရင္ေတာ႔ 10 လုံး ေဖာက္ရင္ 9 လုံးေလာက္ အဆင္ေၿပတာကုိ ေတြ႔ရပါတယ္။
တစ္နည္းအားၿဖင္႔ ေၿပာရရင္ Service သမားေတြ အထူးကုိ ေဆာင္ထားသင္႔တဲ႔ APK ဆုိ
မမွားပါဘူးေနာ္။ အသုံးၿပဳပုံက ေဆာ႔ဝဲလ္ကုိ ဖြင္႔ ၿပီး Start Root
ကုိ ႏွိပ္ေပးရမယ္ ၿဖစ္ပါတယ္။ ဒါဆုိရင္ ရာႏႈန္ေၿပးေနလိမ္႔မယ္ 100 ရာႏႈန္း
ၿပည္႔ရင္ ဖုန္းဟာ Restart က်သြားၿပီး ဖုန္းၿပန္ပြင္႔လာရင္ Superuser
Icon ေလး တစ္ခု ထက္တုိးလာရင္ Ok ပါၿပီးဗ်ာ။MM Font Installer V1.0 For Android

Version :1.0
Size :1.6 MB
Format : Apk
O/S : Android
မဂၤလာပါဗ်ာ MM Font Installer ကုိ အသုံးၿပဳရန္အတြက္ မိမိဖုန္းတြင္ Root Access ရရွိရန္ လုိအပ္ပါသည္။ Root မရွိေသးေသာ ဖုန္းမ်ား ဒီပုိစ္႔ ေလ႔လာၿပီး Root ေဖာက္လုိ႔ ရပါတယ္။ ၿမန္မာစာကုိ 99 ရာႏႈန္းမွန္မယ္ ၿဖစ္ပါတယ္။ အသုံးၿပဳပုံက Install ကုိ ႏွိပ္ရမယ္ ၿဖစ္ပါတယ္။ ဒါဆုိရင္ မိမိ ဖုန္းဟာ Root Access ရရွိထားပါက ဖုန္း Restart ၿပန္က်သြားၿပီး ဖုန္းၿပန္ပြင္႔ လာရင္ ၿမန္မာလုိ ၿမင္ရမယ္ ၿဖစ္ပါတယ္ဗ်ာ။
မဂၤလာပါဗ်ာ MM Font Installer ကုိ အသုံးၿပဳရန္အတြက္ မိမိဖုန္းတြင္ Root Access ရရွိရန္ လုိအပ္ပါသည္။ Root မရွိေသးေသာ ဖုန္းမ်ား ဒီပုိစ္႔ ေလ႔လာၿပီး Root ေဖာက္လုိ႔ ရပါတယ္။ ၿမန္မာစာကုိ 99 ရာႏႈန္းမွန္မယ္ ၿဖစ္ပါတယ္။ အသုံးၿပဳပုံက Install ကုိ ႏွိပ္ရမယ္ ၿဖစ္ပါတယ္။ ဒါဆုိရင္ မိမိ ဖုန္းဟာ Root Access ရရွိထားပါက ဖုန္း Restart ၿပန္က်သြားၿပီး ဖုန္းၿပန္ပြင္႔ လာရင္ ၿမန္မာလုိ ၿမင္ရမယ္ ၿဖစ္ပါတယ္ဗ်ာ။
Android Phone ေပၚမွာ ေဂါက္ရိုက္ခ်င္သုူမ်ားအတြက္
Version :1.0
Size : 3.11MB
Format : Apk
O/S : Android
ဤအသံုးခ်ပရုိဂရမ္တြင္
ေဂါက္ရုိက္သမားမ်ားအတြက္ နဥ၁္းစနစ္မွန္စြာ ေဂါက္သီးကစားနိုင္ရန္
ျဖစ္ပါတယ္။ ေဂါက္သီးကစားျခင္းသဥ၁္ က်န္းမာေရးလည္းျဖစ္၊ စီးပြားေရးလည္းပါ၊
သံတမန္ေရးရာလည္း အက်ဳံး၀င္ေသာ အထက္တန္းက်သဥ၁့္ ဘ၀ေနမႈ
ပံုစံတစ္ခုပင္ျဖစ္ပါတယ္။ ေဂါက္သီးရုိက္ျခင္းကို အဆင့္တန္းရွိရွိ၊
စနစ္က်လွပစြာ ရုိက္ႏုိင္ေစရန္သာမက အေျခခံလဥ၁္းေကာင္းေစရန္
အမွားမ်ားျပင္ဆင္ႏုိင္ေစရန္ ရဥ၁္ရြယ္၍ ေရးသားထားျခင္း ျဖစ္ပါတယ္။Ringtone Cutter (For Android)

ဒီေဆာ႔၀ဲလ္ေလးကေတာ႔ဖုန္းထဲက mp-3 သီခ်င္း
ေတြကုိလုိသေလာက္ဖုန္းထဲမွာပဲအလြယ္တစ္ကူ
ဖ်က္လုိ႔ရတဲေဆာ႔၀ဲလ္ေလးေပါ႔ကုိယ္ၾကဳိက္တဲ႔
ေနရာကေနလည္းဖ်က္လုိ႔ရတယ္ေလၾကဳိက္ရင္
ေဒါင္းသြားလုိက္ေနာ္ေဘာ္ေဘာ္ဒုိ႔
(File Size1.11 MB)>>>zippyshare<<<
Music Volume EQ (For Android)
ဒိေဆာ႔၀ဲလ္ေလးကေတာ႔Android ဖုန္းေတြမွာ
သီခ်င္းနားေထာင္ေနစဥ္သီခ်င္းသံေလးေတြကုိ
ေၿပာင္းၿပီးနားေထာင္လုိ႔ရတဲ႔ေဆာရ၀ဲလ္ေလးပါ
သုံးခ်င္ရင္ေတာ႔ေဒါင္းသြားလုိက္ေနာ္
(File Size 2.14MB)>>>zippyshare<<<
Android Phone မွာ gtalk ခ်က္မယ္
OctroTalk-For Android (Android ဖုန္းမွာ အလန္စား Gtalk ခ်က္မယ္)
မဂၤလာပါဗ်ာ Android ဖုန္းပုိင္ရွင္ေတြ အတြက္ မိမိတုိ႔ဖုန္းမွာ ပါလာတဲ႔ Gtalk ကုိ မသုံးခ်င္ဘူး မႀကဳိက္ဘူးဆုိရင္OctroTalk ကုိ ေဆာင္ထားပါဗ်ာ အေပၚက ပုံကုိႀကည္႔ပါကြန္ပ်ဴတာ အတုိင္းပါပဲ ဒုတိယ ေၿမာက္ ပုံက ကြ်န္ေတာ္ သူငယ္ခ်င္း တစ္ေယာက္နဲ႔ စကားေၿပာေနတဲ႔ပုံပါႀကဳိက္တယ္ဆုိရင္ေတာ႔ ေအာက္က လင္႔နွင္႔ ေဒါင္းႏုိင္ပါၿပီးFlie Size (1.17MB) ရွိပါတယ္္
Download>>>>>>>>>>>>>>>>zippyshare.com
C8813 Network Lock ေျဖနည္း

ပထမဆုံး နည္းလမ္း ကေတာ့
ဖုန္းက Root လုပ္ထားၿပီးသား ျဖစ္ရပါမယ္....
၁. ဖုန္းမွာ Root Explorer.apk ထည့္ထားရပါမယ္ မရွိရင္ေဒါင္းပါ
၂. Root Explorer ဖြင့္ပါ။
၃. "build.prop" ကုိရွာ မင္မုိရီကဒ္ ထဲ Copy ကူးပါ။ ကြန္ပ်ဴတာထဲေရႊ႕ပါ ။ text ဖုိင္အေနနဲ႕ဖြင့္ပါ။
၄. "ro.config.ct_card_lock = true" ဖုိင္ကုိရွာၿပီး true ေနရာမွာ false ေျပာင္းၿပီး Save ပါ။
၅. ဖုိင္ကုိ ဖုန္းထဲျပန္ကူးထည့္။ Root Explorer ျပန္ဖြင့္ပါ။
၆. ညာဘက္ေဒါင့္မွာ ရွိတဲ့ R/W ကို R/O ေျပာင္းပါ မင္မုိရီကဒ္ ကေန ဖုန္းရဲ႕ Root ထဲကူးထည့္
Overwrite လုပ္ပါ။
၇. အားလုံးၿပီး Restart ခ် စက္ျပန္တက္လာရင္ GSM Network ရေနမယ္...
ဒုတိယနည္း
၁. Bootloader Unlock လုပ္ပါ
၂. CWM သြင္းပါ CWM ကေတာ့ ဒီမွာယူပါ Download
ေဒါင္းရန္
၃. ၿပီးရင္ေတာ့ဒါေလးကို CWM ကေန flash ေပးလိုက္ပါေနာ္ Download
Box Driver Pack (Android Clone)
Volcano
|
Subscribe to:
Comments (Atom)


.com+%281%29.png)


.com+%281%29.png)
.com+%282%29.png)