Showing posts with label Android Problem မ်ား. Show all posts

Tuesday, May 20, 2014

Android မွာေပၚတဲ့ Safe Mode

Screenshot_2013-08-29-14-07-58.jpg 


Credit to - နည္းပညာတကၠသိုလ္ ( မေကြး )

Phone မွာ software/Game ေတြအထည့္မ်ားၿပီး Force Close ေတြေပၚ၊ Uninstall လုပ္ဖို႔ကလဲ ဖုန္းက ေကာင္းေကာင္း အလုပ္မလုပ္၊ ဟိုဟာႏွိပ္လဲမရ ဒီဟာႏွိပ္လဲမရတဲ့သူေတြ အတြက္။ Safe Mode ထဲ၀င္ၿပီး Uninstall လုပ္ၾကည့္ပါ။ Safe Mode ထဲမွာ System အတြက္ လိုအပ္တာေတြပဲ အလုပ္ လုပ္ပါတယ္။ ထပ္ၿပီးထည့္ထားတဲ့ software/Game ေတြကအလုပ္ မလုပ္ေတာ့ပါဘူး။ App Drawer ထဲမွာလဲ မေတြ႔ ရေတာ့ပါဘူး။ Setting ထဲ၀င္ၿပီး Uninstall လုပ္ၾကည့္ပါ။ ကြန္ပ်ဴတာက Windows Safe Mode နဲ႔ သေဘာ သဘာ၀ တူပါတယ္။


Samsung Galaxy S4 Safe Mode:
1. Turn off the device.
2. Press the power button to turn it on.
3. When the screen turns up keep tapping the soft Menu key that is left to the Home button till the device
boots up.

Safe Mode on Galaxy S3, Note 2 and Others:
This is the most common way of booting Galaxy Devices into Safe Mode:
1. Turn off the phone.
2. Press the Power key to restart it.
3. When you see the Samsung Logo screen, press and hold the Volume Down key till the device boots up.

Safe Mode on HTC One, One X and Other Devices:
HTC devices have a common method of entering the Safe Mode. I have tested it on HTC One.
1. Turn fastboot off in your power settings.
2. Switch off the device.
3. Power it on
4. Once you see the HTC splash screen, press and hold the Volume Up key till the phone boots up in Safe
Mode.
On some HTC devices like Desire S, you need to press the Volume Down key instead.

Safe Mode on Nexus 4 and Other Device:
If you got a Google Nexus device or have installed an AOSP, AOKP or CyanogenMod based custom ROM, you
can get into Safe Mode as described below. This method works on most devices with Jelly Bean.
1. Press & hold Power button
2. It’ll bring up Power off/Reboot options
3. Then press & hold the “Power Off” option
4. It’ll ask for your confirmation to boot device into Safe Mode.
5. Tap OK button.


Safe Mode on Motorola Devices:
1. Power the device off.
2. Power the device on.
3. When the Motorola splash screen appears, press and hold Volume Up /Down keys simultaneously.
4. Continue to hold the Volume Up & Down keys until Safe mode appears in the lower left corner of the
screen.

***How to Exit Safe Mode:***
Exiting Safe Mode on most Android devices is as easy as powering off and then turning them on. However,
there are a few devices on which you will have to hold the button combination you used to enter Safe
Mode to exit it. There are some other devices that require you to press and hold the volume down key to
boot device normally.


Orginal Link: http://www.droidviews.com/how-to ... ces-into-safe-mode/


အဆင္ေျပပါေစ..


Post by zaw win htwe

Friday, May 16, 2014

Android ဖုန္းေတြမွာ Pattern / Pin lock က်ေနတာကို ဖ်က္မယ္


 မိမိတို႕ရဲ႕ Android ဖုန္းေတြမွာ Pattern / Pin lock ေတြေမ့သြားရင္ပဲျဖစ္ျဖစ္ Google Accounts ေတြေတာင္းေနရင္ပဲျဖစ္ျဖစ္  ဘာမွစိတ္မပူပါနဲ႕ 3 မိနစ္ အတြင္းနဲ႕ အျပီးျဖည္ေပးမည့္ ွSoftware ေလးကိုမွ်ေ၀ေပးလိုက္ပါတယ္ခင္ဗ်ာ။
ဒီ ေဆာ့၀ဲလ္ေလးက BAT Group မွကို Zahtet Ni ေရးသားထားေသာ Software ေလးျဖစ္ပါတယ္...။
BAT Group မွကို Zahtet Ni ကို အထူးပဲေက်းဇူးတင္ရွိပါတယ္။ Credit လည္းေပးပါတယ္ခင္ဗ်ာ။


 လိုအပ္ေသာေဆာ့၀ဲလ္ကို ေအာက္မွာကလင့္မွ ေဒါင္းလုပ္ဆြဲလိုက္ပါ ...ေဒါင္းလို႕ရတဲ့ rar ဖိုင္ေလးထဲမွ Remove Pattern Lock & AllAccount .exe ဖိုင္ကိုRunလိုက္ပါ ။ ဒီေဆာ့၀ဲလ္ကို အသံုးျပဳဖို႕အတြက္
မိမိတို႕ဖုန္းဟာ Root ေဖါက္ၿပီးသားျဖစ္ရပါမယ္။
ၿပီးရင္ေတာ႕ USB debugging နဲ႕ Unknown sources ကိုအမွန္ျခစ္ၿပီး ဖုန္းကို ကြန္ပ်ဴတာနဲ႕
ခ်ိတ္လိုက္ပါ။ ဖုန္း Drvier ကိုကြန္ပ်ဴတာကသိပါေစ။
အားလံုးအဆင္သင့္ျဖစ္ၿပီဆိုရင္ေတာ့ Pattern Lock ကို  ကလစ္တခ်က္ႏွိပ္လိုက္ပါ
သူ႕ဘာ့သူ အလုပ္လုပ္ၿပီး Pattern Lock ကို ျဖည္သြားပါလိမ္႕မယ္။ ျပီးသြားရင္ေတာ႕ ဖုန္းက Reboot က်သြားပါလိမ့္မယ္။ လိုက္ေကာက္မေနပါနဲ႕...... :P
ဖုန္းျပန္ပြင့္လာရင္ေတာ့ ဖုန္းမွာ မည္သည့္ Pattern & Pin Lock လံုး၀(လံုး၀) မရွိေတာ႕တာကိုေတြ႕ရပါမယ္ခင္ဗ်ာ။
အကယ္၍မ်ား Pattern & Pin Lock အႏွိပ္မ်ားၿပီး G Mail အေကာင့္ေတာင္းလာပါက
 ေအာက္က All Account ကိုႏွိပ္ေပးလိုက္ပါ .....

Saturday, February 22, 2014

Samsung Factory mode remover ေျဖရွင္းနည္း

Samsung Factory mode remover


အေပၚကပုံမွာ ျဖစ္ေနတဲ့အတုိင္းေလး သင့္ဖုန္းမွာျဖစ္ေနတယ္ဆုိရင္


ေျဖရွင္းေပးဖုိ႕ အတြက္ ဒီ file ေလးကုိျပန္လည္မွ်ေ၀ေပးလုိက္ပါတယ္။

ဘယ္လုိလုပ္ရမလဲဆုိေတာ့ Phone ကုိ USB debugging on ေပးျပီး ...

 Download ဆြဲလုိ႕ရလာတဲ့ 

Samsung Factory mode remover.rar file ေလးကုိ ျဖည္ျပီးလုိ႕

ထြက္လာတဲ့ Folder ထဲက Factory_Mode_Remover.exe ေလးကုိ Run ေပးလုိက္ပါ။

Enter တစ္ခ်က္ေခါက္ေပးလုိက္ပါ။

phone မွာ Reboot က်ျပီး ျပန္တက္လာရင္ အဆင္ေျပသြားပါျပီ။

လုိအပ္တဲ့အခ်ိန္အဆင္ေျပေအာင္ ျပန္လည္မွ်ေ၀ေပးလုိက္ပါတယ္။

လုိအပ္မယ္ဆုိရင္ေတာ့.......


က်ေတာ္ျပန္လည္မွ်ေ၀ေပးလုိက္တဲ့ အရာတစ္ခုပာာ တစ္ဦးတစ္ေယာက္အတြက္ အေထာက္အကူ
ျဖစ္မယ္ဆုိရင္ ေက်နပ္ပါတယ္။
..........::::: အဆင္ေျပပါေစ :::::..........

phone sim unlock လုပ္ခ်င္သူမ်ားအတြက္

sim unlock code ကိုတြက္ခ်က္ေပးမဲ ့ software.....ေလးပါ....တန္ဖိုးအရမ္းရိွပါတယ္ခင္ဗ်ာ....ပံုမွန္ဆိုရင္ ကၽြန္ေတာ္ တို ့ဦးေဏွာက္နဲ ့ေတာ္ေတာ္ေလး တြက္ခ်က္ ရမဲ ့အေျဖကို တစ္ထိုင္တည္း ရွာေပးမဲ ့ေဆာ ့ဝဲေလးလည္းျဖစ္ပါတယ္.....မိမိတို ့ရဲ ့မိတ္ေဆြေတြကို လည္း အြန္လိုင္းကေန ဒီ ေကာင္ေလးကိုအသံုးျပဳျပီး အကူအညီေပး နုိင္ပါျပီ...ပံုမွန္ဆိုရင္ေတာ ့ sim unlock လုပ္တာ နိုင္ငံျခား ဆိုဒ္ေတြမွာ ေဒၚလာ ကိုေသာက္ေသာက္ လည္ေအာင္ေတာင္းပါတယ္....ကၽြန္ေတာ္ကေတာ ့ဖရီးအေနနဲ ့ျပန္လည္မ်ွေဝထားပါတယ္...အသံုးျပဳပံုေလးကို တစ္ခါတည္းပါ ေဖာ္ျပေပးထားတာမို ့....အသံုးျပဳ လိုတယ္ဆိုရင္ ေအာက္မွာေဒါင္းလုပ္ယူၾကပါ...ဒီေနရာမွာ SIM LOCK ဆိုတာနားမလည္ေသးတဲ ့သူေတြအေနနဲ ့ကၽြန္ေတာ္ ဘေလာ ့မွာအေသးစိတ္ေရးထားတာေလးကို ဒီမွာ ဝင္ဖတ္ေပးပါ။
လုိအပ္ခ်က္အေနနဲ ့ကေတာ ့
==========================
1 . ROOT လုပ္ထားရပါမယ္။
2. အရင္ဆံုး sim unlock လုပ္ဖို ့အတြက္Android Terminal Emulator ကိုအရင္ ေဒါင္းထားပါ။
3. မိမိတို ့ ဖုန္းကို *#06# ကိုနိုပ္ျပီး IMEI နံပါတ္ကိုရွာေပးပါ 
 UN LOCK CODE ကိုတြက္ခ်က္ပံု
========================= =
Terminal Emulator app ကိုဖြင္ ့ျပီး
 su [enter]

strings -n 8 /dev/block/mmcblk0p6[enter] ကိုနိုပ္ေပးပါ။ ဒါဆိုရင္ မိမိရဲ ့ IMEI 
နံပါတ္ပါတာတစ္ခုကိုေတြ ့ရပါလိမ္ ့မယ္... [ဥပမာ] UN_Lock_code = 063312345 
မ်ိဳးေပၚလာပါလိမ္ ့မယ္.
  
ဒါဆိုရင္ေတာ ့ ....UNLOCK ကုဒ္ရပါျပီ။......
 ဒီေဆာ ့ဝဲေလးကို မိမိတိို ့ pc မွာ install လုပ္ထားေပးပါ...ဖုန္းနွင္ ့ခ်ိတ္စရာမလိုပါဘူးခင္ဗ်ာ...
အေပၚက UN LOCK CODE ေနရာမွာမိမိတို ့ရရိွထားတဲ ့ကုဒ္ကို  ျဖည္ ့ေပးလုိက္ပါ..ေအာက္မွာ IMEI နံပါတ္ကို ေနာက္ဆံုး ( ၇ ) လံုးကိုထည္ ့ေပးလိုက္ပါ။
ျပီးရင္ OK နိုပ္တာနွင္ ့.....ေအာက္မွာ SIM UNLOCK ကုဒ္ထြက္ေပၚလာပါလိမ္ ့မယ္....
မိမိတို ့ဖုန္းကို SIM UNLOCK လုပ္ဖို ့အတြက္ဖုန္းကိုပါဝါပိတ္ျပီး  SIM CARD 
ကိုထုတ္လို္က္ပါ။။။ ေနာက္မိမိအသံုးျပဳလိုတဲ ့ SIM CARD ကိုထည္ ့ လုိက္ပါ...ျပီးရင္ အေပၚက ရထားတဲ ့ 
SIM UNLOCK ကုဒ္ကိုရိုက္ထည္ ့ေပးလုိက္ပါ........ဖုန္း REBOOT 
က်ျပီးျပန္တာလာတာနွင္ ့မိမိတို ့ဖုန္းကိုအသံုးျပဳလုိ ့ရပါျပီ...


ဒီပုိစ္ေလးကို အျမဲသိမ္းထားခ်င္တယ္ဆိုရင္ ဒီမွာ ေဒါင္းပါ။

Thursday, February 13, 2014

Huawei G 610-U00 Safe Mode Error


Huawei G 610-U00 Safe Mode Error ကို ကြ်န္ေတာ္ ျဖည္နိုင္ခဲ႕တဲ႕ နည္းလမ္းေလးကို ေျပာျပခ်င္လို႕ပါဗ်ာ သိျပီးတဲ႕အကိုေတြ ေက်ာ္ဖတ္လိုက္ပါေနာ္ …မသိေသးတဲ႕ အကို ညီမ်ားအတြက္ပါ …ကိုယ္ေတြ ေျဖရွင္းခဲ႕တဲ႕ နည္းေလးမို႕လို႕ တင္ေပးလိုက္တာပါဗ်ာ
၁ ဒီ error က Vol – ေျကာင္႕ျဖစ္တာပါ …..ေနာက္ဆံုး ဖန္း၀ဲ ျပန္တင္တာေတာင္ Safe Mode နဲ႕ ပဲ ျပန္တက္လာပါတယ္ ….အဲဒါနဲ႕ ဟိုေမးဒီေမးဟိုျကည္႕ဒီျကည္႕ နဲ႕ပဲ Safe Mode ေပ်ာက္သြားတာပါ
pw & vol – တြဲနွိပ္ရင္ new ..safemode old…risk ဆိုေပၚလာတာကိုေတြ႕ရမွာပါ
ဆိုေတာ႕ ၁ ဘတ္ထြီျဖဳတ္လိုက္ပါ
၂ ျပန္တပ္ျပီးပါ၀ါဖြင္႕ W 3G ဆိုေပၚလာခဲ႕ရင္ vol – ေလးဖိထားလိုက္ပါ …..ေနာက္ဆံုးlock screen ေရာက္သြားခဲ႕ရင္ safe mode ေပ်ာက္သြားတာကိုေတြ႕ရမွာပါ …..
က်ေနာ္စမ္းသပ္ေအာင္ျမင္ ျပီးျဖစ္တဲ႕အတြက္ ေသျခာသေလာက္ပါပဲဗ်ာ။

Wednesday, February 12, 2014

အားသြင္းလြန္၍ စက္မနိဳးေတာ့သည့္ Glaxy S4

အားသြင္းလြန္၍ စက္မနိဳးေတာ့သည့္ Glaxy S4 စက္ျပင္မွတ္တမ္း ( ျမန္မာလို Ebook )

 
Credit to - U Maung Naing

အမ်ိဳးအစား  -  စက္ျပင္မွတ္တမ္း ( ျမန္မာpdf )
ေရးသားသူ    -    ဦးေမာင္နိဳင္
အရြယ္အစား  -    303KB


Download => Mediafire / Solidfiles

Thursday, February 6, 2014

Samsung Phone က ဘက္ထရီမခံလို ့စိတ္ညစ္ေနသူမ်ားအတြက္နည္းလမ္း


ဒီနည္းေလးကို သုံးၾကလားမသိ ။ ဖုန္းက ဘက္ထရီ ခဏခဏ ကုန္ေနသူမ်ားအတြက္

အထိုက္ေလ်ာက္ ေျပလည္ေစမယ့္ နည္းပါ လက္ေတြ ့အေနနဲ ့က်ေနာ္ကိုယ္တိုင္ပါပဲ

သြားေလရာ အားသြင္းဖို ့Charging ယူ စားေသာက္ဆိုင္ ကားဂိတ္ပါမက်န္  သြင္းရျပီး

အလုပ္ထဲတစ္ခု  အိမ္တစ္ခု  Charging ထားရတဲ့ ဒုကၡက  အေတာ္ေလး  သက္သာျပီ

ဆိုင္က၀ယ္လာတဲ့အတိုင္းသာ မျပင္ရင္  ဖုန္းက  ခဏခဏအားကုန္တယ္။ အဲ့ေတာ့

အေရးေၾကာင္းဆို  ဖုန္းက အားမရွိဘူး ။ အသည္းသန္ခ်က္တင္လုပ္ေနရပီဆို ကုန္ပီ

ဒီနည္းကေတာ့ အလင္းကို အဆံုးထိ ထားလို ့ မ်က္ေစ့ထိခိုက္ႏိုင္တယ္ ။  မတတ္ႏိုင္

ဘယ္ေန ့ေသမလဲ မသိတဲ့ဘ၀  အိုရင္မ်က္ေစ့မြဲမွာ စိုးရိမ္မေနေတာ့ဘူး ။ ဒီနည္းကို

က်ေနာ္ သံုးပါတယ္ ။ 50% မက အားကုန္သက္သာပီး အၾကာၾကီးသံုးခံပါေၾကာင္း..။


Brightness အလင္းကို ျဖစ္ႏိုင္ရင္ အနိမ့္ အဆံုးထိထားပါ Auto ကို အမွန္ခ်စ္ျဖဳတ္

အသံမသံုးနဲ ့ ( ခ်က္ေနစဥ္မွာေျပာတာ.ပလံု..ပလံုက.. က အား ပိုကုန္တယ္ )

PACKET DATA/Wifi / GPS and Location services  မသံုးေသးရင္ မဖြင့္ပါနဲ ့

အားျပည့္ေအာင္သြင္းပါ အားသြင္းေနစဥ္ မသံုးနဲ ့ ( သီခ်င္း ဖြင့္ရင္ပိုဆိုးတယ္)

Vibration မထားပါနဲ ့ အဲ့ေလာက္ဆို ၀ယ္လာတဲ့အတိုင္းသံုးတာထက္ ေတာ္တယ္။ 

Bluetooth မသံုးရင္ ပိတ္ထားလိုက္ ။  ေနာက္ပီး Account Synchronization Off ပါ


ဖုန္းမွာ ဘက္ထရီမွာ အားအစားဆံုးက စကရင္ LED အလင္းပါ ။

ေအာက္ကလင့္မွာ ပိုအေသးစိတ္ေရးထားပါတယ္..ေလ့လာၾကည့္ပါ


Ref Link = http://www.android.gs/increase-samsung-galaxy

Google Play Store က Apk ေတြကို ကြန္ပ်ဴတာ မွ ေဒါင္းယူနည္း (10000% Working)


ဒီ Post ေလးကို ကိုေက်ာ္ ရဲ႕ဆိုဒ္ကေနျပီး ကူးယူမွ်ေ၀ေပးတာျဖစ္ပါတယ္ဗ်ာ။ ကၽြန္ေတာ္ျပည္တြင္းဆိုဒ္ေတြ က ကူးယူမွ်ေ၀တာရွားပါတယ္။ အေတာ္ေလးကိုေကာင္းမြန္ျပည့္စံုတဲ႕ Post ဆိုရင္ေတာ့ကူးယူမွ်ေ၀ေပးပါ တယ္ အေၾကာင္းကေတာ့ မူရင္း Post ပိုင္ရွင္ရဲ႕ အရည္အခ်င္းနဲ႕ ေစတနာကို Credit ေပးတဲ႕သေဘာနဲ႕ပါ။ ကဲဗ်ာ ကၽြန္ေတာ္ေလေၾကာေတြရွည္မေနေတာ့ပါဘူး ေအာက္မွာ ကိုေက်ာ္ကပံုနဲ႕တကြအေသးစိတ္ ရွင္းျပေပး ထားပါတယ္။ေလ့လာၾကည့္ပါဦးေနာ္။
Google Play Store က Apk ေတြကို ကြန္ပ်ဴတာကေန ဘယ္လိုေဒါင္းယူရလဲ ခဏခဏ ေမးေနၾကလို႔  သိပ္အလုပ္မရွဳတ္ေစတဲ႔ နည္းလမ္းေလးကို တင္ေပးလိုက္ပါတယ္ ... 100% အဆင္ေျပပါတယ္ ကိုယ္တိုင္ စမ္းသပ္ျပီးသားပါ...။
အရင္ဆံုး  ဒီ Download Real APK Leecher ကို ေဒါင္းယူပါ...
Zip ဖိုင္လ္ကိုျဖည္လိုက္ပါ...


ပံုပါအတိုင္း Real APK Leecher ကို Double Click နဲ႔ Run လိုက္ပါ....


နံပါတ္ (1) Google Play Store မွာ မိမိသံုးတဲ႔ Gmail / Password နဲ႔ Device ID ကို မွန္ေအာင္ ေရးထည့္ပါ...။
 နံပါတ္ (2)  မွာ မိမိေဒါင္းယူလိုက္တဲ႔ APK ေတြကို သိမ္းထားေပးမဲ့ ေနရာကို ေရြးေပးလိုက္ပါ..။

Device ID မသိရင္ မိမိ Android ဖုန္းကေန *#*#8255#*#*  ကို ရိုက္ျပီး ရွာပါ....


Device ID ဆိုတာ မွ်ားျပထားတဲ႔ ေနရာက ကုဒ္ ေတြပါ...။

အဆင္မေျပရင္ ဒီ Download ID.Apk ေလးကို ေဒါင္းယူျပီး မိမိ ဖုန္းမွာ Install ျပီး Run လိုက္ပါ ....


Device ID ဆိုတာ မွ်ားျပထားတဲ႔ ေနရာက ကုဒ္ ေတြပါ...။ အေပၚက ပံုနဲ႔ အတူတူပါပဲ...။
အားလံုး မွန္ကန္စြာ ေရးထည့္ျပီးျပီဆိုရင္ေတာ့ ေအာက္နားေလးက Save ကို ႏွိပ္ျပီး သိမ္းလိုက္ပါ...။ Real APK Leecher ကို ပိတ္ျပီး ျပန္ဖြင့္လိုက္ရင္..


 အေပၚကပံုအတိုင္း Error Massage ေလး တတ္လာမွာပါ ... OK ႏွိပ္လိုက္ပါ... ဘာမွ မျဖစ္ပါဘူး ...


 မိမိ လိုခ်င္တဲ႔ APP ကို ေရးျပီး Enter ေခါက္ျပီး ရွာလိုက္ပါ...။


လိုခ်င္တာ ေတြ႕ျပီဆိုရင္ Select မွတ္ျပီး Right Click နဲ႔ Download this app ကို ႏွိပ္ပါ....


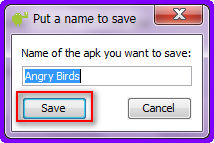
App  နာမည္ကို ျပင္ေရးခ်င္ရင္လည္း ေရးလို႔ရပါတယ္ ျပီးရင္ Save ကို ႏွိပ္ပါ.......


ပံုပါအတိုင္း Download လုပ္ေနပါျပီ... 100% ျပီးရင္ မိမိ သိမ္းထားတဲ႔ေနရာမွာ ေရာက္ေနပါျပီ...

အားလံုးအဆင္ေျပၾကပါေစ...

ခင္မင္လွ်က္

Viber ကေန ကုိယ္မေခၚေစခ်င္တဲ့ Viber Call မ်ား ၊ Message မ်ားကုိ Block နည္း


Viber ကေန ကိုယ္မသိတဲ့သူေတြ ၊ ကုိယ္ဖုန္းမေခၚေစခ်င္တဲ့သူေတြက messages ေတြ ph call ေတြ ဝင္ေန ေခၚ လာေန လို႔ စိတ္အေနွာက္အယွက္ျဖစ္ေနရင္ မလာေအာင္လုပ္တဲ့နည္းေလးပါ။ အရင္ဆံုး ရိွၿပီးသား viber ထဲကေန exit(from more option)နဲ႔ထြက္လိုက္ပါ။
ေနာက္ ျပန္ပီးေတာ့ activate လုပ္ဖို႔အတြက္ မိမိဖုန္း နံပါတ္ျပန္ရိုက္ ထည့္တဲ့အခါ မိမိဖုန္းနံပါတ္ရဲ႕ ေနာက္ ဆံုး မွာ ဂဏန္းတစ္လံုး အပိုထည့္ရိုက္လိုက္ပါ။ e.g.09400000011 (ေနာက္ဆံုး 1 ကအပို တလံုးပါ) Viber ကေန code အတြက္ ဖုန္းေခၚတဲ့အခါ မိမိရဲ႕ဖုန္းထဲကိုပဲ ဝင္ပါတယ္။ေနာက္ဆံုး ဂဏန္းက အက်ံဳး မဝင္ ပါဘူး။
Viber အခ်င္းခ်င္းအတြက္က်ေတာ့ အပိုထည့္လိုက္တဲ့ ဂဏန္းတလံုးက အက်ံဳးဝင္ပါတယ္။ အဲ..viber code ရပီဆိုရင္ေတာ့ မိမိဆီကို messages,ph call ေတြေခၚေစခ်င္တဲ့သူကို ကိုကအရင္ message ပို႔လိုက္ပါ။ ဒါမွ မိမိ အပိုထဲ့ထားတဲ့ viber ph နံပါတ္ကိုသူတို႔ကသိမွာပါ။
ဒါဆိုရင္ေတာ့ မိမိဆီကို မပို႔ေစခ်င္တဲ့ messagesေတြ မလာေစခ်င္တဲ့ ဖုန္းcallေတြကို ကာကြယ္ပီးသား ျဖစ္ၿပီး viber ေၾကာင့္စိတ္အေနွာက္ အရွက္ျဖစ္ေနတဲ့ ေရာင္းရင္းတို႔လဲ ေအးေဆးျဖစ္ သြား ပါလိမ့္ပါမည္။
 Creadit ~ ဂႏၴဝင္ ဗိသုကာ ကုမၸဏီီ
အားလံုးအဆင္ေျပပါေစ.......။

Monday, January 20, 2014

Huawei Y320 internet setting ခ်ိန္နည္းေလးပါ


Huawei Y320-C00
 

CDMA 800 Handset
 

MEC internet setting ခ်ိန္နည္းပါ။
 

Access Point Names ထဲကရွိျပီးသား 

CTWAP ကိုပဲ edit လုပ္ပါ
 

Name - mectel
 

APN - #777
 

Username - card@c800.mm
 

Password - card
 

APN protocol - IPv4/IPv6
 

APN roaming - IPv4/IPv6
 

Bearer - eHRPD
 

ဒါဆို 3G ကြန္နက္ရွင္နဲ႔လန္းလို႔ရပါျပီ။

မရရင္ reboot လုပ္လုိက္ပါ။ ျပန္တက္လာရင္ 3G ေလးနဲ႔ လန္းလို႔ရပါျပီ။